Fake yourself


    I got contacted by http://eyecandylens.com/ and asked if I'd want to try and review some of their products, including colored contact lenses and false lashes, and of course I wanted!

    I picked Bambi Princess Mimi Apple Green contacts, and No. 4 Sexy Eye False Eyelashes (they seem to be out of stock :S).
    Package arrived very fast, it was neatly packed, and everything was intact.

    I took Princess Mimi contacts, because their diameter is 15mm instead of the normal 14mm, and I wanted BIG EYES.
    Well, I got what I asked!


    Huuuuuge eyes! (There are also the eyecandy lashes in pictures above)
    And they feel so comfortable, like I wouldn't have contacts at all!

    Here's some daily looks with the contacts and lashes:
    They work with glasses too I think!

    As well as without glasses!

    I haven't really done any wild looks recently, but they worked with this blue look too:

    And one of the reasons I've been quiet, is this:

    Well, not excatly that, but more this:
    Done by J. Salakka
    It's in my upper back, I love it, and in that picture it is one day old, so it's not healed yet, but I still had to share the picture :3

    Who knows what it's inspired by?

bopicsgays

    bopicsgays

Tutorial: Royal Sugar Skull

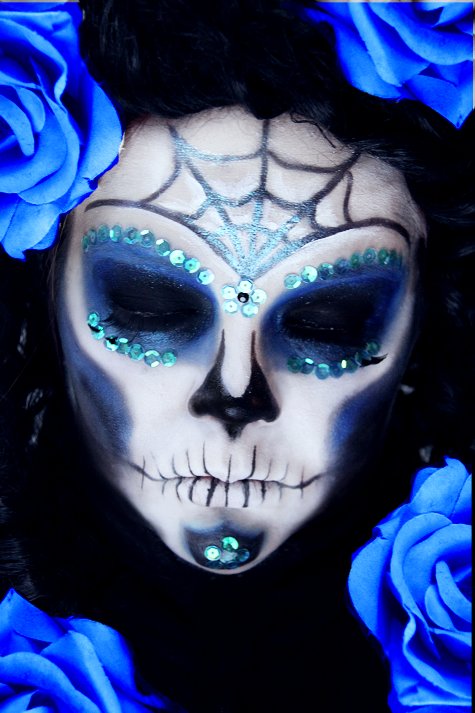
    It's here, it's done!

    Personally, I think this might be the best mask/makeup I have ever done, I L-O-V-E how it came out.
    It's such a shame I did it quite late at night, so the lighting wasn't the best, and pics didn't turn out as stunning as they could have, but you can't always win :P


    Start with the white / light base. I know I should've done it much whiter myself, but of well:
    Still sick, that's why the tired look
     Then I made line from the corner of my mouth almost to ear (I used basic black pencil):

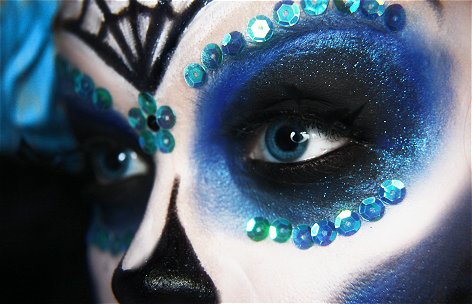
    Then some more depth to cheeks, I used MUFE flash colors black, and some blue and turquoise:

    Continue the shading, find your own bone structure, and apply more dark to it:

    Then the nose. There lots of different ways to do the "skull nose" (or noseless)I chose this one. I used again MUFE black flash color, which I then finished with matte black eyeshadow to make it appear deeper and less shiny:

    Then eyes. Again, find where your bone are, go with them. I wanted to make them also bigger, so I extended the color higher. I used MAC greasepaint stick Slick Black, because I didn't want it to smudge:

    Then I used blue base (MUFE blue & turquoise flash color) on the edger of black on eyes, and then applied Sugarpill Royal Sugar over the blue base:

    I also applied Royal Sugar to cheeks, so they would go well with the eyes and look deeper too:

    Then I applied some sequins to the look (and I used basic lash glue to attach them):

    ..and same for the other side:

    I then just drew black thin line to my lips, so they would look kinda like teeth (I used black liquid eyeliner, because I didn't find my thin brush at that moment :D):

    Next I did both the web-thing to the forehead, as well as the chin- thingie. On forehead I just drew the lines with black pencil, and on chin I used again black, and blue&turquoise for "blending", and added sequins in the shape of a flower in the middle of it:


    Then I applied MAC Reflects Transparent Teal on the web- thingie, and again put sequins in the shape of a flower:

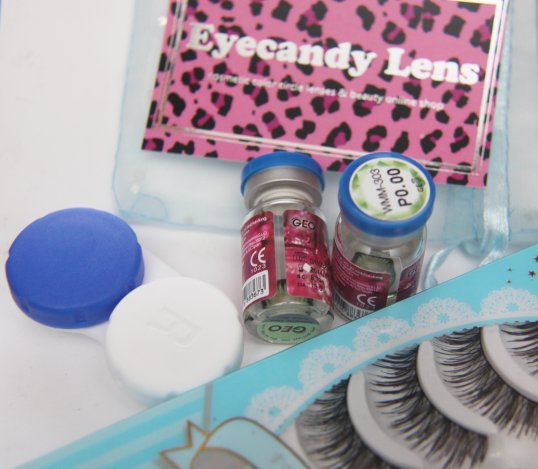
    Finally I added small black rhinestones in the middle of the "flowers", applied black liner to my waterline, added some mascara, and some random falsies (
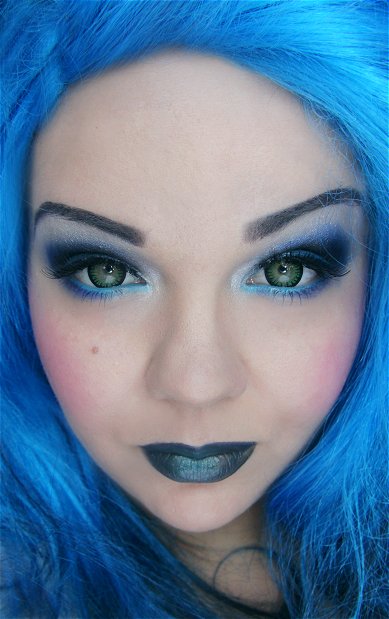
FE129 from kkcenter HK). Then I put on a wig and attached some flowers to it, and the look was done.

    If you're planning to do this look for halloween (or any other event) remember to also add white to your ears (if they are showing) and neck... I didn't, because I did this just for fun.


    PS.
    Guess what (or WHO) was on Illamasqua's newsletter?

    I almost went nuts, that's how honered and happy I was! <3

Illamasqua Morale

    Next up in my Illamasqua reviews is Morale Shimmer blush:
    Morale is very pink blush with sorta cold (blueish?) shimmer, and some tiny golden sparkles. "Rosed flush, shimmer finish" says Illamasqua's website.

    Unfortunately this is just not my color. I rarely use pink blushes, I'm more of a peachy blush user, and when I use pink, I want it to be matte.
    So I can't really tell if this is a good shade or not, I just know it's not my shade :/
    But what I can tell, is that it's pigmented and quite easily blendable.
    If you like pink shimmery blushes, I can suggest you'd give this one a try!

    Applied lightly and heavily:


    Then I got a little carried away with Theatre of the Nameless, and created another look inspired by the looks of this collection.
    I know I said yesterday that I wasn't inspired by the sharp lines and all, but hey, that was yesterday :3

    These are pretty heavily photoshopped, because it was bad weather out today, and the pics came out really dark and ugly, so I had to brighten them and smudge them anddddd :P


    • Illamasqua Cream Pigment Dab
    • Illamasqua Shimmer Blush Morale
    • Black eyeliner/ pencil / gel liner

    And finally, last but not least, I made an awesome look this evening. 
    This is for halloween, and I know that if I go somewhere this halloween, I do this one to myself again!
    Hopefully I'll trough pics tomorrow, and you'll get to see how I did this look, it was actually quite easy look to do.

    Here's a sneak peek of Royal Sugar Skull:


Theatre of Jangsara


    Welcome to the Theatre of the Nameless!
    I was lucky to receive some products from Illamasqua's new collection, and here's a review of two lip products from the collection, and a recreation of one of the looks!


    Like I've said many times before, I love the style of Illamasqua. They always have the most wildest ideas with makeup, and they don't leave it to just lids and lips, they extend the look to forehead, nose, cheeks, chin, hair, accessories and nails. (Do you know anyone else who does that? It starts with J and ends with angsara ;D)
    In Theatre of the Nameless I wasn't inspired so much by the drawn sharp lines, but this look:


    So I took my brushes and made this:


    One with "bit" less photoshopping:
    Face
    • Loreal studio secrets primer
    • Chanel light foundation & Grimas white cream color
    • MUFE pink flashcolor & Illamasqua Morale blush on cheeks and temples
    • Illamasqua Breathe Pure Pigment as a highlighter
    Eyes:
    • Illamasqua Resolute liquid metal
    • MUFE pink & red flashcolor 
    • Illamasqua Berber Pure Pigment
    • Illamasqua Zeitgeist Pure Pigment
    • MAC Reflects Rust 
    • Illamasqua Breathe Pure Pigment
    • MAC Blacktrack fluidline
    • Illamasqua Masquara
    Lips:
    • Illamasqua Kontrol lipstick
    • Illamasqua Breathe Pure Pigment


    Then the lip products:


    Lipstick Kontrol:
    I love Illamasqua's lipsticks. I own five or six of them, and so far only one (Disciple) has been a small disappointment being a bit dry when applying. Others have been awesome. 
    They are dry, but creamy and easy to apply. Colors are awesome too.
    Kontrol is deep, a little grayish matte purple.
    I know I'll be using a lot in my wilder looks!


    Sheer lipgloss Violate:
    I own two intense lipglosses and one sheer lipgloss from Illamasqua, and I've always though that the sheer would mean it's sheer :D Well I guess it really means it, but I really put this to the intense category rather than sheer. It's dark poison green, not the color you choose for your daytime look.
    It's also pretty hard to apply, I guess since it's 'sheer', it isn't opaque, but when it's such a bold color, the result should be quite transparent.
    I haven't really figured what should this be worn with, that it would look good, but I guess I'll think of something ;D


Total Pageviews